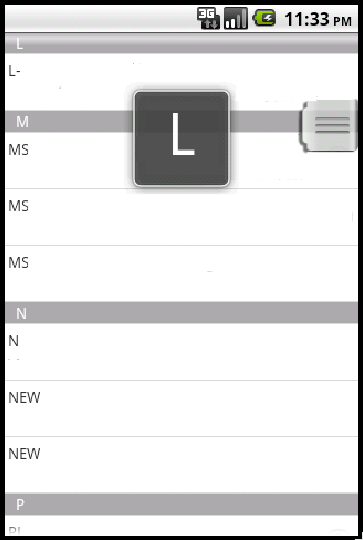
なにが言いたいかというと, 下のように,
①「セクションの区切りの部分のフィールド」
②「右の部分の高速スクロール用のつまみ」
③「中央に表示されているインデックス文字の表示」
を行う方法について, ちょっと解説していきます。(諸事情により, 画像の内容加工して文字を先頭以外見えなくしています。笑)
これは調べてもなかなか情報がなかったため、いっそのことまとめておけば、こんな自分でも役立つかなー(?)と。笑
方針としては,
①「セクションの区切りの部分のフィールド」 => isEnabledのオーバーライドを使用して, 区切りの場合はViewを変更する
②「右の部分の高速スクロール用のつまみ」=> ListViewに対して android:fastScrollEnabled="true" 設定
③「中央に表示されているインデックス文字の表示」=> SectionIndexerをimplementsする
必要な部分のみ記述してます。
<list.xml> メインのレイアウトファイル
<?xml version="1.0" encoding="utf-8"?>
<LinearLayout xmlns:android="http://schemas.android.com/apk/res/android"
    android:layout_width="wrap_content"
    android:layout_height="fill_parent"
    android:orientation="vertical"
    >

    <ListView
        android:id="@+id/ListViewSample"
        android:layout_width="fill_parent"
        android:layout_height="0dip"
        android:layout_weight="1"
        android:fastScrollEnabled="true" <!-- スクロール用のつまみ表示 -->
        >
    </ListView>

</LinearLayout>
<listview_item.xml> リストの各項目のためのレイアウトファイル
<?xml version="1.0" encoding="utf-8"?>
<LinearLayout xmlns:android="http://schemas.android.com/apk/res/android"
    android:layout_width="fill_parent"
    android:layout_height="wrap_content"
    android:orientation="vertical"
    >
    <TextView        android:id="@+id/listview_name"
        android:layout_width="wrap_content"
        android:layout_height="wrap_content"
        />
</LinearLayout>
<listview_sep.xml> 区切り部分のレイアウトファイル
<?xml version="1.0" encoding="utf-8"?>
<LinearLayout xmlns:android="http://schemas.android.com/apk/res/android"
    android:layout_width="wrap_content"
    android:layout_height="wrap_content"
    android:orientation="vertical"
    android:background="#AAA"
    android:paddingLeft="10px"
    >
    <TextView
        android:textColor="#FFFFFF"
        android:layout_width="fill_parent"
        android:layout_height="wrap_content"
        android:id="@+id/listView_initial"
        >
    </TextView>
</LinearLayout>
<CustomAdapter.java>
public class CustomAdapter extends ArrayAdapter<Contentvalues> implements SectionIndexer{
    private LayoutInflater layoutInflater_;
    private int separetorResourceId = R.layout.listview_sep; // 区切り用のフィールド
    private final String SEP_FLAG = "sepFlag";
    private HashMap<String, Integer> indexer = new HashMap<String, Integer>();
    private String[] sections;

    // Constructor
    public CustomAdapter(Context context, int textViewResourceId, List<Contentvalues> objects) {
         // 一度空のobjectで初期化 (addで区切りを入れながら追加するため)
        super(context, textViewResourceId, new ArrayList<contentvalues>());
        layoutInflater_ = (LayoutInflater) context.getSystemService(Context.LAYOUT_INFLATER_SERVICE);

        /// 区切りを挿入しながらデータを追加
        int listLength = objects.size();
            String pre_initial = ""; int sep_num = 0;
            for(int index=0; index<listLength; index++){
                ContentValues cv = objects.get(index);

                String initial = cv.getAsString("name").substring(0, 1); // nameの頭文字を基準に区切る
                if(!initial.equalsIgnoreCase(pre_initial)){ // 頭文字の判定(頭文字が変わったら追加)
                    ContentValues cv_sep = new ContentValues();
                    cv_sep.put(SEP_FLAG, true); cv_sep.put("text", initial);
                    this.indexer.put(initial, index + sep_num);
                    add(cv_sep); sep_num++;
                    pre_initial = initial;
                }
            add(cv); // ArrayAdapterにObjectを追加
          }

        ArrayList<string> sectionList = new ArrayList<String>(indexer.keySet());
        Collections.sort(sectionList);
        sections = new String[sectionList.size()];
        sectionList.toArray(sections);
    }

    // ViewHolderクラス
    static class ViewHolder{
        TextView textView_name;
    }

    @Override
    public View getView(int position, View convertView, ViewGroup parent){

        // 特定の行(position)のデータを得る
        final ContentValues cv = (ContentValues)getItem(position);
        ViewHolder holder;

        // convertViewは使い回しされている可能性があるのでnullの時と, 区切り用のビューに設定されている場合に新しく作成
        if (null == convertView || convertView.getId() != R.layout.listview) {
            convertView = layoutInflater_.inflate(R.layout.listview, null);
            holder = new ViewHolder();
            holder.textView_name = (TextView)convertView.findViewById(R.id.listview_name);
            convertView.setTag(holder);
        }else{
            holder = (ViewHolder) convertView.getTag();
        }

        if(!isEnabled(position)){ // 区切りの場合は, 区切り用のビューを変更する
            convertView =  layoutInflater_.inflate(separetorResourceId, null);
            TextView sep_text = (TextView)convertView.findViewById(R.id.listView_initial);
            sep_text.setText(cv.getAsString("text")); // 区切りに表示するテキストを設定
        }else{ // 区切りでない場合
            holder.textView_name.setText(cv.getAsString("name"));
        }

        return convertView;
    }

    @Override
    public boolean isEnabled(int position){ // 区切りの場合はfalse, そうでない場合はtrueを返す
        ContentValues cv = getItem(position);
        if(cv.containsKey(SEP_FLAG)){ // 区切りフラグの有無チェック
            return !cv.getAsBoolean(SEP_FLAG);
        }else{
            return true;
        }
    }

    // 以下は, SectionIndexerの実装部分

    @Override
    public int getPositionForSection(int section) {
        return indexer.get(sections[section]);
    }

    @Override
    public int getSectionForPosition(int position) {
        return 1;
    }

    @Override
    public Object[] getSections() {
        return sections;
    }

}
ブログに載せるために, 本来のソースではなく, 余分な部分をカットしながら記事を書いていて、今回記述したソース自体は実行していないので、もしかしたら細かいエラーがあるかも。その場合はご連絡してもらえるとありがたいです。でもまぁ、方針的にはこれでできるので許してください。。。
また、ArrayAdapter<Contentvalues> の型で行っていますが、別にContentvaluesじゃなくて専用のクラスをつくっちゃってもいいですね(そっちの方が分かりやすくていいかも。笑)そして、メモ書きという程度で書いていて、今回頭文字の判定の部分はテキトーです(英字のUpperCaseとLowerCaseの判定や, 「カ」と「ガ」を同じセクションにしたり・・・などという細かいことはしてません)。すいません。。
一度案件がおちついて整理する時間があったら書き直そうかと思ってます。


2 コメント:
Hi Wonderful code ,can you please post Activity classes.
コメントを投稿