ラベル android の投稿を表示しています。 すべての投稿を表示
2011/05/30 0 コメント

Android - SQLiteでの複数レコード挿入

複数のレコードを追加するためのメソッドを作成しました。
conflictAlgorithm には, SQLiteDatabase.CONFLICT_NONE, SQLiteDatabase.CONFLICT_REPLACE などの, コンフリクトが発生した場合の処理を指定します。
また, transaction を true にした場合は, トランザクション処理を併用します。

/**
 * insert a lot of data
 *
 * @param nullColumnHack 
 * @param valueList 値のリスト
 * @param conflictAlgorithm コンフリクト発生時の処理
 * @param transaction トランザクション処理を併用するか否か
 * @return Boolean 成功 or 失敗
 */
public Boolean insertMany(SQLiteDatabase db , String table , String nullColumnHack, List<ContentValues> valueList, int conflictAlgorithm, Boolean transaction) {
    
    if(valueList != null && valueList.size() > 0){
        String[] CONFLICT_VALUES = new String[]{"", " OR ROLLBACK ", " OR ABORT ", " OR FAIL ", " OR IGNORE ", " OR REPLACE "};

        // At first, create sql statement
        ContentValues initialValues = valueList.get(0);
        
        // Measurements show most sql lengths <= 152
        StringBuilder sql_build = new StringBuilder(152);
        sql_build.append("INSERT");
        sql_build.append(CONFLICT_VALUES[conflictAlgorithm]);
        sql_build.append(" INTO ");
        sql_build.append(table);
        // Measurements show most values lengths < 40
        StringBuilder values = new StringBuilder(40);

        Set<Map.Entry<String, Object>> entrySet = null;
        
        if (initialValues != null && initialValues.size() > 0) {
            entrySet = initialValues.valueSet();
            Iterator<Map.Entry<String, Object>> entriesIter = entrySet.iterator();
            sql_build.append('(');

            boolean needSeparator = false;
            while (entriesIter.hasNext()) {
                if (needSeparator) {
                    sql_build.append(", ");
                    values.append(", ");
                }
                needSeparator = true;
                Map.Entry<String, Object> entry = entriesIter.next();
                sql_build.append(entry.getKey());
                values.append('?');
            }
            sql_build.append(')');
        } else {
            sql_build.append("(" + nullColumnHack + ") ");
            values.append("NULL");
        }

        sql_build.append(" VALUES(");
        sql_build.append(values);
        sql_build.append(");");
        String sql = sql_build.toString();
        
        SQLiteStatement statement = null;
        
        // if transaction id true, beginTransaction()
        if(transaction){
            db.beginTransaction();
        }
        try {
            for(int i=0,length=valueList.size(); i<length; i++){
                statement = db.compileStatement(sql);
                initialValues = valueList.get(i);
                entrySet = initialValues.valueSet();
                
                // Bind the values
                if (entrySet != null) {
                    int size = entrySet.size();
                    Iterator<Map.Entry<String, Object>> entriesIter = entrySet.iterator();
                    for (int j = 0; j < size; j++) {
                        Map.Entry<String, Object> entry = entriesIter.next();
                        DatabaseUtils.bindObjectToProgram(statement, j + 1, entry.getValue());
                    }
                }
                // Run the program and then cleanup
                statement.execute();
                statement.close();
            }
            
            // if transaction id true, setTransactionSuccessful()
            if(transaction){
                db.setTransactionSuccessful();
                db.endTransaction();
                transaction = false;
            }
            return true;
        } catch (SQLiteDatabaseCorruptException e) {
            throw e;
        } finally {
            if (statement != null) {
                statement.close();
            }
            // if transaction id true, endTransaction()
            if(transaction){
                db.endTransaction();
            }
        }
    }
    return false;
}
2011/05/10 0 コメント

Android - SQLite 文字列ソート

SQLiteの文字列ソートにおいて (SQLiteに限らず) , かな, 英字, 数字, 記号 の順番を群単位で変えたい場合は, そのためのフィールドを追加するのが一番簡単っぽい。というより、これしか思い浮かばなかった。

デフォルトだと<数字, 英字 .... >という順番だったが, ワードの頭文字に対して<かな, 記号(その他), 数字, 英語> という順番にソートしたかった。そこで, sortgroupというフィールドを目的のテーブルに作成する。

sortgroupの値は, 半角カナ → 1, 記号(その他) → 2, 数字 → 3, 英字 → 4 とする。

こうすれば, SELECT * FROM table ORDER BY sortgroup ASC みたいにすれば取ってこれるよね。

で、頭文字がどのタイプのものかを判別するためのプログラムは以下

public class CheckWordType {
    // 文字列が 半角カタカナ(1), その他(2), 数字(3), アルファベット(4)のどれかを調べる
    public int checkCharType(char c){
        if(c >= 0xff66 && c <= 0xff9d){ // 半角カタカナ (1) http://ash.jp/code/unitbl1.htm 参照
            return 1;
        }else if(Character.isLetter(c)){ // アルファベット (4)
            return 4;
        }else if(Character.isDigit(c)){ // 数字 (3)
            return 3;
        }else{ // その他 (2)
            return 2;
        }
    }
}

まぁ、まとめるほどの事でもないんだけど、書く記事がなかったんでw
2011/04/27 0 コメント

Android - プログラムでLinearLayoutのGravity属性を設定

LinearLayoutそのものを中央寄せしたい場合は, 以下のように LayoutParams の gravity 変数に値を設定すれば良い。

LinearLayout.LayoutParams lp =
    new LinearLayout.LayoutParams(LinearLayout.LayoutParams.WRAP_CONTENT,
                                  LinearLayout.LayoutParams.WRAP_CONTENT);
lp.gravity = Gravity.CENTER_HORIZONTAL; 
view.setLayoutParams(lp);


view.setGravity(gravity); で設定しようとしてはまったのでメモ。
LinearLayout の小ビューの中央寄せはをする場合に, view.setGravity(gravity); を使うのかな?
0 コメント

Android - 画面の横幅と縦幅の取得

画面の横幅と縦幅を取得したい場合は以下の様にすれば良い

DisplayMetrics metrics = new DisplayMetrics();
getWindowManager().getDefaultDisplay().getMetrics(metrics);
int width = metrics.widthPixels;  // 横幅サイズを取得
int height = metrics.heightPixels;  // 縦幅サイズを取得

ちなみに, 幅が小さいほうが横幅, 大きいほうが縦幅というわけではなく, その時の画面の向きに対する横幅・縦幅です。
2011/04/18 0 コメント

Android - HTTP-POST通信を行う

HTTPのPOST処理を行う場合は, 以下のようにすればOK.

/**
 * HTTP POSTを行う
 *
 * @param url HTTP通信を行うターゲットのURL
 * @param requestParams パラメータ
 * @param encode HTTP要求時の文字コード
 * @return 受信結果の文字列
 */
public String httpPostRequest( String url, Map<String, String> requestParams, String encode ){
 try{        
  HttpPost httppost = new HttpPost( url );
     DefaultHttpClient client = new DefaultHttpClient();
 
     // リクエストパラメータの設定
        List<NameValuePair> params = new ArrayList<NameValuePair>();
        for (Map.Entry<String, String> entry : requestParams.entrySet()) {
            params.add(new BasicNameValuePair((String) entry.getKey(), (String) entry.getValue()));
        }
 
     // POST データの設定
     httppost.setEntity(new UrlEncodedFormEntity(params, encode));

     HttpResponse response = client.execute( httppost );
     int status = response.getStatusLine().getStatusCode();
 
     // 結果が正しく帰って来なければエラー
     if ( status != HttpStatus.SC_OK ){ throw new Exception( "" ); }
 
     return EntityUtils.toString( response.getEntity());
 }catch ( Exception e ){
  return null;
 }
}


POST データを付加する際,
httppost.setEntity(new UrlEncodedFormEntity(params, encode));
とするが, ここで第二引数に, ちゃんと encode を指定してあげること。
内部エンコードがUTF-8だろうからって指定しなかったために、えらい目に会いました。

Webプログラム (PHP等) でもそうだけど、文字コードは明示的にちゃんと指定してあげなきゃだめですね。猛省。。。
2011/04/05 0 コメント

Android - 画面の向きの固定方法

画面の向きを固定したい!という場合があると思います。
その場合は, 以下の様にすれば良い。

// 画面の向きを固定
public void fixDisplayOrientation(){
    Configuration config = getResources().getConfiguration();
    if(config.orientation == Configuration.ORIENTATION_PORTRAIT){
        setRequestedOrientation(ActivityInfo.SCREEN_ORIENTATION_PORTRAIT);
    }else if (config.orientation == Configuration.ORIENTATION_LANDSCAPE){
        setRequestedOrientation(ActivityInfo.SCREEN_ORIENTATION_LANDSCAPE);
    }
}

// 画面の向きの固定を解除
public void unfixDisplayOrientation(){
    setRequestedOrientation(ActivityInfo.SCREEN_ORIENTATION_UNSPECIFIED);
}

ここで, 画面の向きを取得するとき, config.orientation の値を使用。
Configuration.ORIENTATION_PORTRAIT なのか Configuration.ORIENTATION_LANDSCAPE なのかで判断する。


しかし, 画面の向きを設定するとき, は, setRequestedOrientation(int orientation) に与える引数の値は, Configuration.ORIENTATION_PORTRAIT や Configuration.ORIENTATION_LANDSCAPE ではなく, ActivityInfo.SCREEN_ORIENTATION_PORTRAIT または ActivityInfo.SCREEN_ORIENTATION_LANDSCAPE なので注意!
2011/04/04 0 コメント

Android - IMEの表示/非表示

IMEをプログラムで表示/非表示の切り替えを行いたかったので、その時のメモ。

まずは表示方法から
// 表示方法
EditText et = (EditText)findViewById(R.id.edittext);

InputMethodManager imm = (InputMethodManager)getSystemService(Context.INPUT_METHOD_SERVICE);
imm.showSoftInput(et, InputMethodManager.SHOW_IMPLICIT);

次に非表示にする方法
// 非表示方法
imm.hideSoftInputFromWindow(v.getWindowToken(),0);
InputMethodManager imm = (InputMethodManager)getSystemService(Context.INPUT_METHOD_SERVICE);

とりあえずこれで出来ました。
2011/04/01 0 コメント

Android - ローディング画像を表示する

画像読み込み中にローディング画像を表示させたい (クルクル回るやつ)。
この場合, Androidに用意されている ProgressBar を使用すれば良い。(gifアニメーションで実現しようとする場合は, 結構めんどくさそう)

<ProgressBar
    android:id="@+id/product_image_loading"
    android:layout_width="wrap_content"
    android:layout_height="wrap_content"
    style="?android:attr/progressBarStyle"/>

これだけでOK。

以下は例, 上から順に, styleは
progressBarStyleSmall
progressBarStyle
progressBarStyleLarge
progressBarStyleHorizontal
です。progressBarStyleHorizontal には, android:indeterminate="true" も指定してある。

2011/03/30 0 コメント

Android - colors.xml について

res/values/ に, colors.xmlというファイルを作成する (以下はその例)。

<?xml version="1.0" encoding="utf-8"?>
<resources>
    <color name="color1">#ff66cdaa</color>
    <color name="color2">#ffff89c4</color>
    <color name="color3">#ffAAAAAA</color>
</resources>

こうすることで, 独自の色を定義することができる。

xml から使用する場合は, android:background="@color/color1" などというように, @color/ で指定して上げれば良い。

プログラム中から使用する場合は, 例として
int color = getResources().getColor(R.color.color1);
view.setBackgroundColor(color); としてあげればOK。


view.setBackgroundColor(R.color.color1)という指定をしてしまってハマったのでメモメモ。
2011/03/29 0 コメント

Android - Activity 起動時にキーボードを表示させない

Activity を起動する際に, EditText にフォーカスが当たっている場合, キーボードが自動で表示される。
これを辞めたい場合 (キーボードの表示を禁止する場合),

setContentView を行う前に,
this.getWindow().setSoftInputMode(LayoutParams.SOFT_INPUT_STATE_ALWAYS_HIDDEN);
をしてあげれば良い。(※ android.view.WindowManager.LayoutParams をimport)

こちらを参考にさせて頂きました。

また, EditTextかたフォーカスが外れたらキーボードを隠したい場合は,

EditText editText = (EditText)findViewById(R.id.EditText01);
editText.setOnFocusChangeListener(new View.OnFocusChangeListener(){

    @Override
    public void onFocusChange(View v, boolean flag){
        if(flag == false){
            InputMethodManager inputMethodManager =
                (InputMethodManager)getSystemService(Context.INPUT_METHOD_SERVICE);
            inputMethodManager.hideSoftInputFromWindow(v.getWindowToken(),0);
        }
    }
});

というように, EditText の setOnFocusChange に inputMethodManager.hideSoftInputFromWindow(v.getWindowToken(),0)
を行わせてあげれば良い。
2011/03/25 0 コメント

Android - startActivityForResult & onActivityResult

メインアクティビティからサブアクティビティを呼び出し, サブアクティビティが終了した際にコールバックを呼ぶ。
ちょっとはまったのでメモ ( . .)Φ

このような事を行う際には,
① メインアクティビティ側で startActivityForResult を使用して サブアクティビティ を起動する。
② サブアクティビティで setResult(...) を使用して, 呼び出し側(メイン) に返す内容を定める
③ メインアクティビティ側の onActivityResult がコールバックで呼び出される。

という流れである。しかし, 呼び出し側 (メイン) と呼び出される側 (サブ) を両方共マニフェストファイルで SingleTask に設定していた場合, これが上手くいかなかった。。

この場合, 呼び出される (サブアクティビティ) 側には SingleTask や SingleInstance は設定しないほうが良いだろうという結論。
2011/03/24 0 コメント

Android - Examination of "Context"

Android では,

AlertDialog.Builder dialog = new AlertDialog.Builder(MainActivity.this);
Intent intent = new Intent(MainActivity.this, HogeActivity.class);

といったように, 引数に Context を渡すことが頻繁にあります。(上でいう MainActivity.this)
この Context に関して, どういうものかを知っておくべきだと思い、自分なりにまとめてみる。


まず知っておくべき事としては

① Context は, アプリケーションのグローバルな環境情報を受け渡すために使用される (コンストラクタの引数によく与えられる)。 (これにより, 特定のアプリケーションのリソースやクラスにアクセスでき, アクティビティ起動やインテントのブロードキャスト, インテント受信といった操作を呼び出せる)

② Context には, Application ContextActivity Context というものが存在する。前者は, getApplicationContext() で取得する Context であり, 後者は上記の例のように 「this」で取得するものである。
後者の「this」は Activity である (Activity クラスは Context を継承している) 。

Application Context はアプリケーションに結び付けられていて, アプリケーションのライフサイクルで同じものである。これに対して, Activity Contextは Activity に結び付けられている ( 画面回転等の様な際に何度も破棄される可能性がある Activity )


では, Application ContextActivity Context はどう使い分ければ良いのか?
それに関するヒントとして,
http://android-developers.blogspot.com/2009/01/avoiding-memory-leaks.html
にメモリリークとの関係性が記述されているので, 参考にしておくと良いと思う。

様々な記事があるが、どれも言ってることは,

① Activity と同じライフサイクルの際には Activity Context を使用する。GUIを扱う際には特に注意すること。
② ライフサイクルが異なる場合に Activity Context を使用すると, メモリリークする可能性がある。その場合はApplication Context を使用するとよい。

ということなのかな?
正直, どちらの Context を使用すればいいか?という答えは難しく, 場合によってって感じでした(すみません。。。)。
なので, 経験を踏んで ライフサイクル を考えながら選ぶべきなんですね。

強いてゆうなれば, Activity のライフサイクルが終了した際に, 同時に破棄したい場合は Activity Context , それ以外やどちらを使用すればよくわかりません..って場合は, Application Context を使用するのが無難なのかな。。って感じです。
2011/03/21 0 コメント

Android - ログアウト処理の実装

前回の記事 (ログイン & ログアウト処理 (スタックの問題点)) で, ログイン & ログアウト処理の実装ではまった内容を説明した。今回はその解決法を説明する。

前回の記事における HogeActivity の内容を以下に変更する。(LoginActivityにもnohistory属性を付加)

package com.dev_grafr.app.logintest;

import android.app.Activity;
import android.content.BroadcastReceiver;
import android.content.Context;
import android.content.Intent;
import android.content.IntentFilter;
import android.content.SharedPreferences;
import android.os.Bundle;
import android.view.View;
import android.widget.Button;

public class HogeActivity extends Activity {
    public static final String PREFERENCES_FILE_NAME = "preference";
    /** Called when the activity is first created. */
    @Override
    public void onCreate(Bundle savedInstanceState) {
        super.onCreate(savedInstanceState);
        setContentView(R.layout.hoge);
        ((Button) findViewById(R.id.logoutBtn)).setOnClickListener(new View.OnClickListener() {
            @Override
            public void onClick(View v) {
                logout();
                Intent broadcastIntent = new Intent();
                broadcastIntent.setAction("com.dev_grafr.app.logintest.LOGOUT");
                sendBroadcast(broadcastIntent);
                Intent intent = new Intent(getApplicationContext(), LoginActivity.class);
                startActivity(intent);
            }
        });
       
        IntentFilter intentFilter = new IntentFilter();
        intentFilter.addAction("com.dev_grafr.app.logintest.LOGOUT");
        registerReceiver(new BroadcastReceiver() {
            @Override
            public void onReceive(Context context, Intent intent) {
                finish();
            }
        }, intentFilter);
    }

    // ログアウト処理
    public void logout(){
        SharedPreferences settings = getSharedPreferences(PREFERENCES_FILE_NAME, 0); // 0 -> MODE_PRIVATE
        SharedPreferences.Editor editor = settings.edit();
        editor.putLong("logged-in", 0);
        editor.commit();
    }
}

これでOK

つまり, ログアウトしましたよ〜。というメッセージをスタック内の Activity に対して BroadCast してあげれば良い。
この BroadCast を受け取ったアクティビティは, 自分自身をfinishする。これで一度にスタックからアクティビティを除去できるわけである。


どうでしょう?なにか他にも ログイン & ログアウト処理 の実装方法があれば, 教えてくださると嬉しいです。
0 コメント

Android - ログイン & ログアウト処理 (スタックの問題点)

ログイン & ログアウト処理があるアプリケーションを作成する際にはまった内容をメモ

最初にはまった内容を、説明します。
問題点とかどうでもいいから、ログイン & ログアウト処理 の方法だけ教えてくれればいいんだよ!って方は, ログアウト処理の実装の方を参照してください

流れとして,
① MainActivity においてログイン済みかどうかの判定を行う (MainAvtivity は, レイアウトを持たないActivityで, アプリケーション起動時の処理などを行うものとする。)
② ログインがされていない場合は, LoginActivity に遷移し, その後ログインが完了したら HogeActivity に遷移
③ ログイン済みの場合は HogeActivity に直接遷移
④ HogeActivity においてログアウト処理が行われたら LoginActivity に遷移する。

ということを考える。
※ ちなみに, ログイン済みか否かは プリファレンスを利用して判断する。また, MainAvtivity はレイアウトを持たないので, android:nohistory 属性をtrueにして, バックキーで戻れないようにしておく。

この流れで作成したファイルは以下

< AndroidManifest.xml >

<?xml version="1.0" encoding="utf-8"?>
<manifest xmlns:android="http://schemas.android.com/apk/res/android"
      package="com.dev_grafr.app.logintest"
      android:versionCode="1"
      android:versionName="1.0">
    <application android:icon="@drawable/icon" android:label="@string/app_name">
        <activity android:name=".MainActivity"
                  android:label="@string/app_name"
                  android:noHistory="true"
                 android:launchMode="singleTask"
                  >
            <intent-filter>
                <action android:name="android.intent.action.MAIN" />
                <category android:name="android.intent.category.LAUNCHER" />
            </intent-filter>
        </activity>
        <activity android:name=".LoginActivity"
                  android:label="@string/app_name"
                 android:launchMode="singleTask"
                  android:noHistory="true">
        </activity>
        <activity android:name=".HogeActivity"
                  android:label="@string/app_name">
        </activity>
    </application>
</manifest>

< MainActivity.java >
package com.dev_grafr.app.logintest;

import android.app.Activity;
import android.content.Intent;
import android.content.SharedPreferences;
import android.os.Bundle;

public class MainActivity extends Activity {
    public static final String PREFERENCES_FILE_NAME = "preference";
    /** Called when the activity is first created. */
    @Override
    public void onCreate(Bundle savedInstanceState) {
        super.onCreate(savedInstanceState);

        if(loginCheck()){ // HogeActivity に遷移
            Intent intent = new Intent(getApplicationContext(), HogeActivity.class);
            startActivity(intent);
        }else{ // LoginActivity に遷移
            Intent intent = new Intent(getApplicationContext(), LoginActivity.class);
            startActivity(intent);
        }
    }

    // ログイン判定
    public Boolean loginCheck(){
        SharedPreferences settings = getSharedPreferences(PREFERENCES_FILE_NAME, 0); // 0 -> MODE_PRIVATE
        if(settings == null) return false;
        int login = (int) settings.getLong("logged-in", 0);
        if(login == 1) return true;
        else return false;
    }
}

< LoginActivity.java >

package com.dev_grafr.app.logintest;

import android.app.Activity;
import android.content.Intent;
import android.content.SharedPreferences;
import android.os.Bundle;
import android.view.View;
import android.widget.Button;

public class LoginActivity extends Activity {
    public static final String PREFERENCES_FILE_NAME = "preference";
    /** Called when the activity is first created. */
    @Override
    public void onCreate(Bundle savedInstanceState) {
        super.onCreate(savedInstanceState);
        setContentView(R.layout.login);

        ((Button) findViewById(R.id.loginBtn)).setOnClickListener(new View.OnClickListener() {
            @Override
            public void onClick(View v) {
                login();
                // ログイン後は HogeActivity に遷移
                Intent intent = new Intent(getApplicationContext(), HogeActivity.class);
                startActivity(intent);
            }
        });
    }
   
    // ログイン処理
    public void login(){
        SharedPreferences settings = getSharedPreferences(PREFERENCES_FILE_NAME, 0); // 0 -> MODE_PRIVATE
        SharedPreferences.Editor editor = settings.edit();
        editor.putLong("logged-in", 1);
        editor.commit();
    }
}

< HogeActivity.java >   ← 失敗例(正しいものは次回のブログで)

package com.dev_grafr.app.logintest;

import android.app.Activity;
import android.content.Intent;
import android.content.SharedPreferences;
import android.os.Bundle;
import android.view.View;
import android.widget.Button;

public class HogeActivity extends Activity {
    public static final String PREFERENCES_FILE_NAME = "preference";
    /** Called when the activity is first created. */
    @Override
    public void onCreate(Bundle savedInstanceState) {
        super.onCreate(savedInstanceState);
        setContentView(R.layout.hoge);
        ((Button) findViewById(R.id.logoutBtn)).setOnClickListener(new View.OnClickListener() {
            @Override
            public void onClick(View v) {
                logout();
                Intent intent = new Intent(getApplicationContext(), LoginActivity.class);
                intent.setFlags(Intent.FLAG_ACTIVITY_CLEAR_TOP); // ← FLAG_ACTIVITY_CLEAR_TOPを設定
                startActivity(intent);
            }
        });
    }
   
    // ログアウト処理
    public void logout(){
        SharedPreferences settings = getSharedPreferences(PREFERENCES_FILE_NAME, 0); // 0 -> MODE_PRIVATE
        SharedPreferences.Editor editor = settings.edit();
        editor.putLong("logged-in", 0);
        editor.commit();
    }
}


[ 場合① ]
MainActivity -> LoginActivity -> HogeActivity と遷移した場合の Activityのスタックは, もちろん以下の通り
MainActivity は nohistory 属性が付いているので () をつけている
____________________________________
| ( MainActivity ) , LoginActivity , HogeActivity
____________________________________

そして, この時 HogeActivity において ログアウト処理を行い, LoginActivity に遷移する。その際にインテントに対して FLAG_ACTIVITY_CLEAR_TOP のフラグを付加することにより, HogeActivity が破棄されて遷移後のスタックは
____________________________________
| ( MainActivity ) , LoginActivity
____________________________________

となる。この場合は問題ない。

[ 場合② ]
しかし!!一度ログインを行い, ログイン済みの場合にアプリケーションを起動した際は, LoginActivity を介さないため,
____________________________________
| ( MainActivity ) , HogeActivity
____________________________________

というスタックになる。ここで ログアウト処理を行って LoginActivity に遷移した場合,
____________________________________
| ( MainActivity ) , HogeActivity , LoginActivity
____________________________________

となってしまうのである。つまり, ログアウトしたにも関わらず、LoginActivityにおいてバックキーを押すと, HogeActivityに戻ってしまう
そこで, HogeActivity でログアウト処理 ----> MainActivity ----> ログイン判定 ----> LoginActivity という遷移で,
FLAG_ACTIVITY_CLEAR_TOPフラグを付加したインテントにより MainActivity を経由すれば, MainActivity 以外がスタックから廃棄され上手くいくのではないか?と考えたのだが, MainActivity にはnohistory属性がついており, これがあるとうまくいかないという現象に陥った。

つまり, nohistory属性 がついていると, スタックに積まれないないため, FLAG_ACTIVITY_CLEAR_TOPを利用してもActivityが破棄されないのではないかという結論に至る(間違ってたらすいません)


実際には, ログインごはログイン画面にはバックキーでは戻れないようにするため, LoginActivityにもnohistory属性をつけるので, そうすると場合①もできないんですよね。笑
だって, MainActivity と LoginActivity が nohistory でスタックが
____________________________________
| HogeActivity
____________________________________

となると考えられるわけですから。。。


つまり, この方法だと上手なログアウト処理ができませんでした。

ログアウトした場合, LoginActivity を除いた全ての Activity をスタックから排除するにはどうすればいいのか・・・。
ということで、次回はこの解決法を説明します。
2011/03/15 0 コメント

Android - imeOptions 補足

キーボードの決定ボタン - imeOptions (EditText)の記事で, 決定ボタンのアイコンを変更したりしたのですが、Simejiなどのキーボードを使用した場合, アイコンが「改行」のままで, さらにそれをクリックした際のイベントが拾えてないことがわかりました。

< 対応前 (前回の記事の場合) >

EditText edittext1 = (EditText) findViewById(R.id.edittext1);
edittext1.setOnEditorActionListener(new OnEditorActionListener() {
    @Override
    public boolean onEditorAction(TextView v, int actionId, KeyEvent event) {
        if (actionId == EditorInfo.IME_ACTION_SEARCH) {
            search(); // search処理
        }
        return true; // falseを返すと, IMEがSearch→Doneへと切り替わる
    }
});

< 対応後 (imeOptionsで指定できない場合にも対応) >

EditText edittext1 = (EditText) findViewById(R.id.edittext1);
edittext1.setOnEditorActionListener(new OnEditorActionListener() {
    @Override
    public boolean onEditorAction(TextView v, int actionId, KeyEvent event) {
        if (actionId == EditorInfo.IME_ACTION_SEARCH || event.getAction() == KeyEvent.ACTION_UP) {
            search(); // search処理
        }
        return true; // falseを返すと, IMEがSearch→Doneへと切り替わる
    }
});

これで一応解決できました。(ほかに解決法ないのかな。。)
0 コメント

Android - スレッドとActivity操作メモ

画像を読み込む際に, 他リソースにある画像をURLで指定し, 取得&描写ということをやりたかったのですが、普通に(スレッドを考えず)やってしまうと、画像取得の際の処理時間がボトルネックになってしまい。全体として描写時間がかかってしまうということに・・・

そこで、スレッドを利用して取得&描写処理を行おうとしたのですが、どうもエラーが・・
ということで、解決したのでメモ。

原因 :「メインスレッドで直接Activityの操作をすることはできない」
解決法:「runOnUiThreadを使用する!(UI用のスレッドから操作すればおk)」
2011/03/14 2 コメント

Android - キーボードの決定ボタン - imeOptions (EditText)

東北地方太平洋沖地震ということで、とても大変な状況ですが、節電しつつ自分なりに普段の生活を送ろうとAndroidアプリ開発を再開 。


EditTextで, IMEの決定アクションを行っ際のイベントを取得したかった為,それに関する内容をまとめました。


まず, EditTextの android:imeOptions フィールドに, actionNone, actionDone, actionNext, actionSend, actionGo, actionSearch
などの値を設定することができます。

これらの値を設定した場合, アイコンが以下の様になります。

< actionNone >


< actionDone >


< actionNext >


< actionSend >


< actionGo >


< actionSearch >


で、これを設定した際のアクションを設定する場合は, 以下のようにすれば良いらしいです。

EditText edittext1 = (EditText) findViewById(R.id.edittext1);
edittext1.setOnEditorActionListener(new OnEditorActionListener() {
    @Override
    public boolean onEditorAction(TextView v, int actionId, KeyEvent event) {
        if (actionId == EditorInfo.IME_ACTION_SEARCH) {
            search(); // search処理
        }
        return true; // falseを返すと, IMEがSearch→Doneへと切り替わる
    }
});

<EditText
    android:id="@+id/edittext1"
    android:layout_width="wrap_content"
    android:layout_height="wrap_content"
    android:inputType="text"
    android:imeOptions="actionSearch"
    android:hint="てすと"
    />


ご参考までに。
2011/03/07 0 コメント

Android - カスタムダイアログの作成方法

カスタムダイアログの作成方法について。例えばこんな感じ↓


デフォルトで用意されている種類のダイアログではなくて, カスタマイズして独自のダイアログの作成を行いたい場合, setView() をしてあげれば良いだけです。


LayoutInflater factory = LayoutInflater.from(MyProductsActivity.this);
// custom_dialog.xmlに, レイアウトを記述
final View inputView = factory.inflate(R.layout.custom_dialog, null);

AlertDialog.Builder builder = new AlertDialog.Builder(this);
    builder.setTitle("選択してください"); // タイトル設定
               .setView(inputView) // レイアウト設定
               .setNegativeButton("閉じる", new DialogInterface.OnClickListener() { // 閉じる際のイベント
})
               .create().show(); // 表示


まぁこんな感じです。つまり, setView()するだけです。
2011/03/05 2 コメント

Android - (ListView) 区切りフィールド付き+インデクス表示付きのスクロール

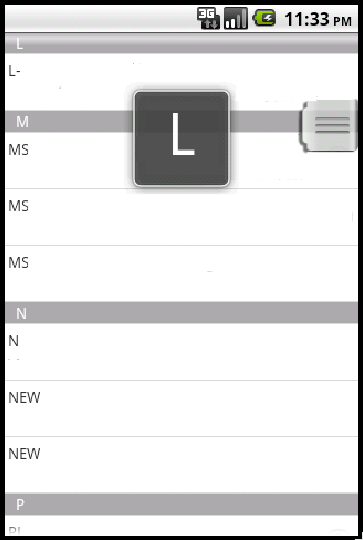
ListViewで区切りフィールド付き+インデクス表示付きのスクロールをしたい!

なにが言いたいかというと, 下のように,

①「セクションの区切りの部分のフィールド」
②「右の部分の高速スクロール用のつまみ」
③「中央に表示されているインデックス文字の表示」

を行う方法について, ちょっと解説していきます。(諸事情により, 画像の内容加工して文字を先頭以外見えなくしています。笑)


これは調べてもなかなか情報がなかったため、いっそのことまとめておけば、こんな自分でも役立つかなー(?)と。笑
方針としては,

①「セクションの区切りの部分のフィールド」 => isEnabledのオーバーライドを使用して, 区切りの場合はViewを変更する
②「右の部分の高速スクロール用のつまみ」=> ListViewに対して android:fastScrollEnabled="true" 設定
③「中央に表示されているインデックス文字の表示」=> SectionIndexerをimplementsする

必要な部分のみ記述してます。

<list.xml> メインのレイアウトファイル
<?xml version="1.0" encoding="utf-8"?>
<LinearLayout xmlns:android="http://schemas.android.com/apk/res/android"
    android:layout_width="wrap_content"
    android:layout_height="fill_parent"
    android:orientation="vertical"
    >
    
    <ListView
        android:id="@+id/ListViewSample"
        android:layout_width="fill_parent"
        android:layout_height="0dip"
        android:layout_weight="1"
        android:fastScrollEnabled="true" <!-- スクロール用のつまみ表示 -->
        >
    </ListView>
    
</LinearLayout>


<listview_item.xml> リストの各項目のためのレイアウトファイル
<?xml version="1.0" encoding="utf-8"?>
<LinearLayout xmlns:android="http://schemas.android.com/apk/res/android"
    android:layout_width="fill_parent"
    android:layout_height="wrap_content"
    android:orientation="vertical"
    >
    <TextView        android:id="@+id/listview_name"
        android:layout_width="wrap_content"
        android:layout_height="wrap_content"
        />
</LinearLayout>


<listview_sep.xml> 区切り部分のレイアウトファイル
<?xml version="1.0" encoding="utf-8"?>
<LinearLayout xmlns:android="http://schemas.android.com/apk/res/android"
    android:layout_width="wrap_content"
    android:layout_height="wrap_content"
    android:orientation="vertical"
    android:background="#AAA"
    android:paddingLeft="10px"
    >
    <TextView
        android:textColor="#FFFFFF"
        android:layout_width="fill_parent"
        android:layout_height="wrap_content"
        android:id="@+id/listView_initial"
        >
    </TextView>
</LinearLayout>


<CustomAdapter.java>
public class CustomAdapter extends ArrayAdapter<Contentvalues> implements SectionIndexer{
    private LayoutInflater layoutInflater_;
    private int separetorResourceId = R.layout.listview_sep; // 区切り用のフィールド
    private final String SEP_FLAG = "sepFlag";
    private HashMap<String, Integer> indexer = new HashMap<String, Integer>();
    private String[] sections;
    
    // Constructor
    public CustomAdapter(Context context, int textViewResourceId, List<Contentvalues> objects) {
         // 一度空のobjectで初期化 (addで区切りを入れながら追加するため)
        super(context, textViewResourceId, new ArrayList<contentvalues>());
        layoutInflater_ = (LayoutInflater) context.getSystemService(Context.LAYOUT_INFLATER_SERVICE);
        
        /// 区切りを挿入しながらデータを追加
        int listLength = objects.size();
            String pre_initial = ""; int sep_num = 0;
            for(int index=0; index<listLength; index++){
                ContentValues cv = objects.get(index);

                String initial = cv.getAsString("name").substring(0, 1); // nameの頭文字を基準に区切る
                if(!initial.equalsIgnoreCase(pre_initial)){ // 頭文字の判定(頭文字が変わったら追加)
                    ContentValues cv_sep = new ContentValues();
                    cv_sep.put(SEP_FLAG, true); cv_sep.put("text", initial);
                    this.indexer.put(initial, index + sep_num);
                    add(cv_sep); sep_num++;
                    pre_initial = initial;
                }
            add(cv); // ArrayAdapterにObjectを追加
          }
        
        ArrayList<string> sectionList = new ArrayList<String>(indexer.keySet()); 
        Collections.sort(sectionList);
        sections = new String[sectionList.size()];
        sectionList.toArray(sections);
    }
    
    // ViewHolderクラス
    static class ViewHolder{
        TextView textView_name;
    }
    
    @Override
    public View getView(int position, View convertView, ViewGroup parent){
        
        // 特定の行(position)のデータを得る
        final ContentValues cv = (ContentValues)getItem(position);
        ViewHolder holder;
        
        // convertViewは使い回しされている可能性があるのでnullの時と, 区切り用のビューに設定されている場合に新しく作成
        if (null == convertView || convertView.getId() != R.layout.listview) {
            convertView = layoutInflater_.inflate(R.layout.listview, null);
            holder = new ViewHolder();
            holder.textView_name = (TextView)convertView.findViewById(R.id.listview_name);
            convertView.setTag(holder);
        }else{
            holder = (ViewHolder) convertView.getTag();
        }
        
        if(!isEnabled(position)){ // 区切りの場合は, 区切り用のビューを変更する
            convertView =  layoutInflater_.inflate(separetorResourceId, null);
            TextView sep_text = (TextView)convertView.findViewById(R.id.listView_initial);
            sep_text.setText(cv.getAsString("text")); // 区切りに表示するテキストを設定
        }else{ // 区切りでない場合 
            holder.textView_name.setText(cv.getAsString("name"));
        }
        
        return convertView;
    }

    @Override
    public boolean isEnabled(int position){ // 区切りの場合はfalse, そうでない場合はtrueを返す
        ContentValues cv = getItem(position);
        if(cv.containsKey(SEP_FLAG)){ // 区切りフラグの有無チェック
            return !cv.getAsBoolean(SEP_FLAG);
        }else{
            return true;
        }
    }
    
    // 以下は, SectionIndexerの実装部分
    
    @Override
    public int getPositionForSection(int section) {
        return indexer.get(sections[section]);
    }

    @Override
    public int getSectionForPosition(int position) {
        return 1;
    }

    @Override
    public Object[] getSections() {
        return sections;
    }

}


ブログに載せるために, 本来のソースではなく, 余分な部分をカットしながら記事を書いていて、今回記述したソース自体は実行していないので、もしかしたら細かいエラーがあるかも。その場合はご連絡してもらえるとありがたいです。でもまぁ、方針的にはこれでできるので許してください。。。

また、ArrayAdapter<Contentvalues> の型で行っていますが、別にContentvaluesじゃなくて専用のクラスをつくっちゃってもいいですね(そっちの方が分かりやすくていいかも。笑)そして、メモ書きという程度で書いていて、今回頭文字の判定の部分はテキトーです(英字のUpperCaseとLowerCaseの判定や, 「カ」と「ガ」を同じセクションにしたり・・・などという細かいことはしてません)。すいません。。

一度案件がおちついて整理する時間があったら書き直そうかと思ってます。
2011/03/03 0 コメント

Android - 固定ヘッダー付きのListView - その2

固定ヘッダー付きのListView - その1
では、RelativeLayoutを使用したけど、LinearLayoutだけで、もっと簡単にできたので(なんで気づかなかったんだろうw)、メモメモ。

<?xml version="1.0" encoding="utf-8"?>
<LinearLayout xmlns:android="http://schemas.android.com/apk/res/android"
    android:layout_width="wrap_content"
    android:layout_height="wrap_content"
    android:orientation="vertical"
    >

    <LinearLayout
        android:layout_width="fill_parent"
        android:layout_height="wrap_content"
        android:orientation="horizontal"
        >

        [ ヘッダー内容 ]

    </LinearLayout>

    <ListView
        android:layout_width="fill_parent"
        android:layout_height="0dip"
        android:layout_weight="1"
        android:id="@+id/ListViewSample"
        >
    </ListView>

    <LinearLayout
        android:layout_width="fill_parent"
        android:layout_height="wrap_content"
        android:orientation="horizontal"
        >

        [ フッター内容 ]

    </LinearLayout>
</LinearLayout>


ListViewの部分に
android:layout_height="0dip"
android:layout_weight="1"

を指定してあげるのがミソ。
簡単ですね〜。
 
;